Scaling Docker Containers with Nginx: A Guide to Reverse Proxy and Load Balancing

I help companies scale across 𝗰𝗹𝗼𝘂𝗱 𝗮𝗻𝗱 𝗼𝗻-𝗽𝗿𝗲𝗺 environments without 𝗼𝘃𝗲𝗿𝗲𝗻𝗴𝗶𝗻𝗲𝗲𝗿𝗶𝗻𝗴. My focus is on building 𝗽𝗿𝗮𝗴𝗺𝗮𝘁𝗶𝗰, 𝗿𝗶𝗴𝗵𝘁-𝘀𝗶𝘇𝗲𝗱 𝘁𝗲𝗰𝗵𝗻𝗼𝗹𝗼𝗴𝘆 𝘀𝘆𝘀𝘁𝗲𝗺𝘀 that support real business needs systems that are reliable, cost-efficient, and easy to operate as the organization grows. I believe technology should enable momentum, not create unnecessary complexity or long-term maintenance burden. I work closely with 𝗹𝗲𝗮𝗱𝗲𝗿𝘀𝗵𝗶𝗽 and 𝗲𝗻𝗴𝗶𝗻𝗲𝗲𝗿𝗶𝗻𝗴 teams to make intentional technology decisions, balancing speed, stability, security, and cost. My approach is grounded in simplicity, clarity, and long-term sustainability rather than chasing tools or trends. My experience includes: • Designing and scaling platforms across cloud and on-prem • Improving system reliability and operational maturity • Optimizing infrastructure costs through thoughtful architecture • Automating delivery and operations to reduce friction and risk I’m hands-on when execution is needed and strategic when direction matters most. Whether a company is preparing to scale or untangling complexity that has built up over time, I focus on solutions that work today and remain sensible tomorrow. If you value 𝗰𝗹𝗲𝗮𝗿 𝘁𝗵𝗶𝗻𝗸𝗶𝗻𝗴, 𝗽𝗿𝗮𝗰𝘁𝗶𝗰𝗮𝗹 𝗲𝘅𝗲𝗰𝘂𝘁𝗶𝗼𝗻, 𝗮𝗻𝗱 𝘁𝗲𝗰𝗵𝗻𝗼𝗹𝗼𝗴𝘆 𝘁𝗵𝗮𝘁 𝘀𝗲𝗿𝘃𝗲𝘀 𝘁𝗵𝗲 𝗯𝘂𝘀𝗶𝗻𝗲𝘀𝘀, we’ll work well togetherGiving up is not in the blood, sir. It's not in the blood.
Introduction
In the world of web development, building scalable and robust REST APIs is crucial. With the increasing popularity of Docker containers, it's essential to know how to scale your Node.js REST API using containers. This guide is inspired by the excellent work of trulymittal, who created a Node.js REST API with MongoDB and Docker, which you can find on their GitHub repository: https://github.com/trulymittal/Nodejs-REST-API.
In this guide, I'll walk you through the process of scaling the Node.js REST API using Docker containers. I'll cover the steps required to containerize the API, set up a MongoDB database using Docker, and then scale the API using Docker Compose. I'll also demonstrate how to use NGINX as a reverse proxy and load balancer to manage traffic to multiple API containers. By the end of this guide, you'll have a scalable and highly available REST API infrastructure that can handle increased traffic and load.
Node.js Express Application
To demonstrate how to scale Docker containers, we will use a simple Node.js Express application from the above GitHub.
const express = require('express');
const createError = require('http-errors');
const dotenv = require('dotenv').config();

const app = express();
const os =require('os');
app.use(express.json());
app.use(express.urlencoded({ extended: true }));

// Initialize DB
require('./initDB')();

const ProductRoute = require('./Routes/Product.route');
app.use('/products', ProductRoute);
app.get ('/',(req,res,next)=>{
  res.json({message:"It works...",hostname: os.hostname()})
});
//404 handler and pass to error handler
app.use((req, res, next) => {
  /*
  const err = new Error('Not found');
  err.status = 404;
  next(err);
  */
  // You can use the above code if your not using the http-errors module
  next(createError(404, 'Not found'));
});

//Error handler
app.use((err, req, res, next) => {
  res.status(err.status || 500);
  res.send({
    error: {
      status: err.status || 500,
      message: err.message
    }
  });
});

const PORT = 3000;

app.listen(PORT, () => {
  console.log('Server started on port ' + PORT + '...');
});
The above code initializes an Express app with middleware to handle JSON and URL encoded data. It also initializes a MongoDB database using the "initDB" module. The code defines a "ProductRoute" for handling HTTP requests related to products and defines a simple root endpoint to return a JSON message and the server's hostname.
If a route is not found, the code uses the "http-errors" module to create a 404 error and passes it to the error handling middleware. The error handling middleware sets the response status code and sends an error object with the status code and error message.
Finally, the code starts the server on port 3000 and logs a message to the console to indicate that the server is running.
Creating the Dockerfile
Next, we need to create a Dockerfile to build our Node.js Express application. Here is the code for the Dockerfile:
# Use the official Node.js image based on Alpine Linux as the base image
FROM node:alpine

# Set the working directory inside the container
WORKDIR /usr/src/app

# Copy package.json and package-lock.json (if exists) from the host to the container's working directory
COPY package*.json .

# Install dependencies defined in package.json inside the container
RUN npm install

# Copy all the files from the host to the container's working directory
COPY . .

# Define the command that will be executed when the container starts
CMD [ "npm", "start" ]
This Dockerfile sets up a Node.js environment in a container by using the official Node.js image based on Alpine Linux. It then copies the package.json file to the container and installs the dependencies defined in it using npm install. After that, it copies all the files in the current directory to the container's working directory. Finally, it sets the default command to run the npm start script defined in package.json when the container is started. This Dockerfile can be used to create a containerized Node.js application.
Creating the docker-compose file
Next, let's create a docker-compose.yml file in our project directory. This file will contain the configuration for our multi-container Docker application.
version: '3'
services:
  mongo_db:
    image: mongo:latest
    restart: always
    volumes:
      - mongo_db:/data/db
  api:
    build: .
    environment:
      PORT: 3000
      MONGODB_URI: mongodb://mongo_db:27017
      DB_NAME: my_db
      NAME: Trulymittal
    depends_on:
      - mongo_db
  nginx:
    image: nginx:latest
    volumes:
      - ./conf.d:/etc/nginx/conf.d
    depends_on:
      - api
    ports:
      - 80:80
volumes:
  mongo_db: {}
This Docker Compose file is used to define and run multiple Docker containers that work together as a single application.
The file defines three services: mongo_db, api, and nginx.
The mongo_db service uses the official mongo image to create a container that runs a MongoDB instance. It also specifies a volume to store the database data.
The api service builds an image from the Dockerfile mentioned earlier, which sets up a Node.js environment in the container and installs the necessary dependencies for the application to run. It also defines several environment variables that the application needs to connect to the MongoDB instance.
The nginx service uses the official nginx image to create a container that serves the API. It mounts a configuration file from the host machine that specifies how to route traffic to the API. It also depends on the api service being available to proxy requests.
Creating the .dockerignore file
The .dockerignore file is used by Docker to exclude certain files and directories from being included in the build context when building a Docker image. This helps to reduce the size of the final image and speeds up the build process.
Dockerfile
.dockerignore
docker-compose.yml
In this case, the .dockerignore file explicitly excludes three files from the build context:
Dockerfile: This is the Dockerfile used to build the image, so it does not need to be included in the build context..dockerignore: This file itself does not need to be included in the build context.docker-compose.yml: This is the Docker Compose file used to define and run the containers, so it does not need to be included in the build context either.
By excluding these files, Docker only includes the necessary files to build the image in the build context, which reduces the overall size of the image and speeds up the build process.
Current Scenario of Workflow.
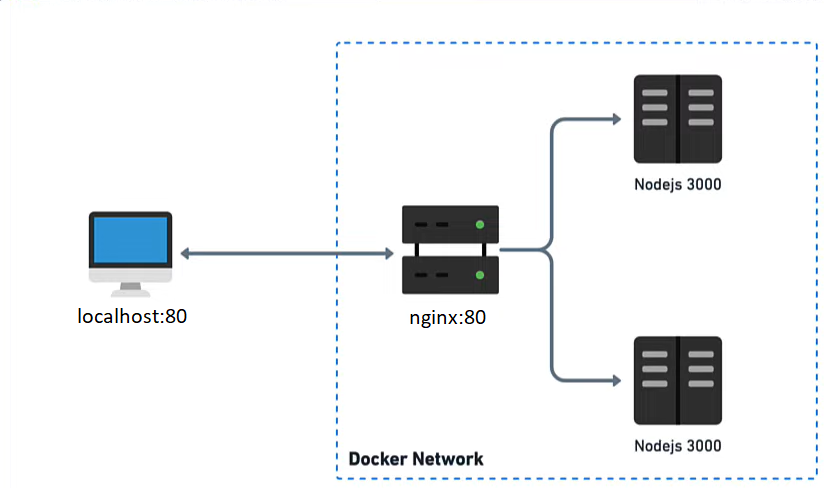
We have configured our nginx container to function as a reverse proxy and load balancer on port 80, directing any incoming requests to the API server. As we scale up the API server, nginx will automatically distribute the requests among the available servers, ensuring that the load is evenly distributed and providing seamless service to users.
Proof of concept.
Now that we have everything we need, let's use the following command to see if everything works out properly or not. If everything works properly, then nginx should act as a reverse proxy and load balancer.
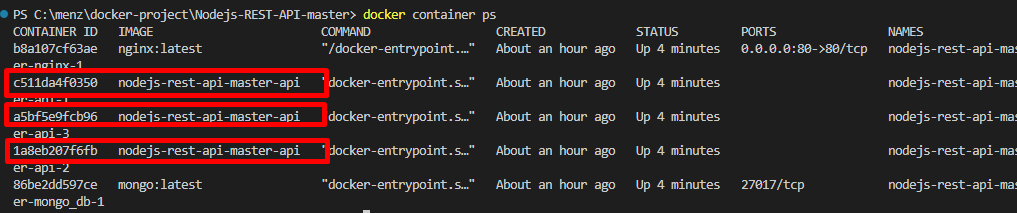
docker compose up --scale api=3
docker compose up --scale api=3 is a command that is used to start a set of containers defined in a Docker Compose file and scale an API service in the Compose file to run three instances of that service.
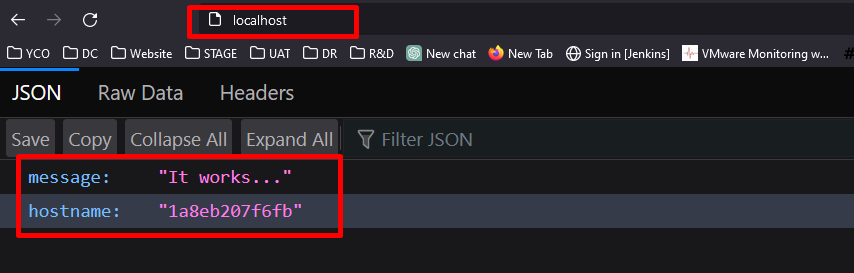
The hostname that is displayed, is actually the container ID. Since we have 3 containers let's check if the load balancer is working properly or not. For context, the round-robin algorithm is used in this demo.
Here is the container ID.
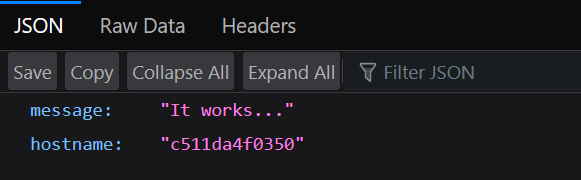
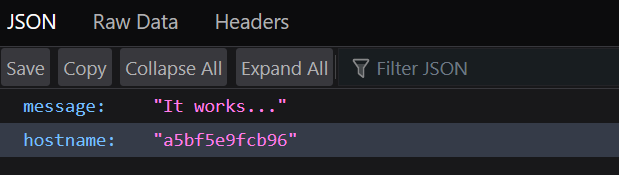
Here we can see that every time we request for API server we see that a new container is responding.
Voilà, there you go that's how you scale docker containers with nginx. Big thanks to trulymittal <3


